LET US NOT FORGET
We live in a time of enormous technological change & it would be foolish not to embrace the new age of digital imaging. The possibilities offered by personal computers loaded with high tech photo imaging software are exciting to say the least. Once an image is scanned into the PC numerous adjustments can be made to enhance or totally change its appearance. Pictures can be left “straight” or combined as montages, turned into posterizations or solarizations at the touch of a button & then printed on ink jet printers. The results of which can be of a very high quality & in terms of colour prints the equal of those produced in a darkroom.
Where does this leave the conventional monochrome worker? Is monochrome photography still worth doing & even more poignant a question is monochrome darkroom printing worth the trouble?
I feel it is worthwhile considering what monochrome photography is all about. What it is not is just a picture with the colour removed. It is an art form in its own right. Another way of seeing pictures, in terms of light & shade, pattern form & texture. A magical world, waiting to be captured by the seeing thinking mono photographer.
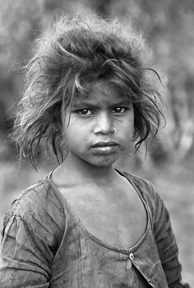
Munta
Taken on a 90mm lens in diffused sunlight
Darkroom mono printing is the classic meeting of art & science. Where artistic interpretation & printing skills combine to produce the “fine print”. The objective is to produce a print that sparkles & looks better in monochrome than it would in colour.
Although it is possible to print monochrome images using a PC the results are different to those produced conventionally. Some of the results can be quite good but seem to lack the depth of a darkroom print. More importantly the pleasure in making a darkroom print is very different to that felt when making one on an inkjet printer.
The point when the image starts to appear in the developer, & the tones start to build is an experience that cannot be matched by the “zipping” of an inkjet printer.
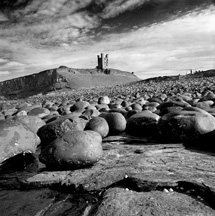
Dunstanburgh Castle - Northumberland
A low viewpoint, red filter & very small aperture f22 was used
Photography is a process of seeing, taking, making & presenting. With technique being applied at each stage. Technique being the means to an end, the way of getting the best results consistently. Working in monochrome allows the photographer to take control of each stage, exposing the film, developing it & printing their interpretation of the picture.
The seeing stage of mono pictures should not be underestimated. What makes a good colour picture may not convert well to monochrome & vice versa. It is vitally important to think in terms of light & shade, which I feel is part of the fascination of the medium. Viewing the subject through a dark blue filter is quite an effective way of reducing the image to tones of one colour & gives a good impression of how it will record as monochrome.
Taking a mono photograph is an exciting challenge. The exposure of the film needs to be carefully considered in order to record the maximum amount of information or detail on the negative. One of the curses of poor monochrome work is the underexposed negative. If detail is not there on the negative it is practically impossible to put in afterwards. One technique that greatly assists in this aim is to “expose for the shadows & develop for the highlights”. Exposing for shadow detail will on most occasions allow the greatest range of tones to be recorded on the negative. Another approach that works well is to base your exposure on the main subject & meter for that subject.
Once the film is exposed the next step is processing it. There are many excellent film developers on the market although I believe it is important to standardise on a film developer combination. Really get to know how the two work together & which combination produces the best results for you. Attention to detail is vitally important at this stage. The manufacturers have invested a fortune in deciding optimum controls & timings, so a good starting point would be the information supplied on the packets. However strict temperature control & timings & cleanliness are essential to produce the best results. Remember extended development builds contrast & a high contrast negative is more difficult to print. So don’t overdevelop, another potential monochrome curse!
After developing, stop bath, fixing & washing the processed film is ready to emerge from the developing tank. It should be left in a dust free atmosphere to dry completely then contact printed so the individual frames can be assessed.
The next stage & possibly the most enjoyable, certainly for the darkroom enthusiast, is the printing of the negative. Test strips to determine the grade of paper & exposure required are essential. Test prints follow & the process leads to the final “fine print”.

Woman of Kritsa
50mm lens in the quite low light of an alley
At this moment in time there are a wide range of printing papers available. Resin coated & fibre based. Resin coated papers are easier to process requiring less development & washing time, are quick to dry & dry flat. They give good results & should not be dismissed. However for maximum quality fibre based papers are best. They are a little trickier to use & require approximately 5 times the washing time of a resin-coated paper but the final image is without doubt superior. A fine print made on a good quality fibre based paper has a sparkle, feel & depth that is without equal.
It is always best to assess a print after it has dried because photographic paper in general & fibre based paper in particular exhibits a characteristic known as “dry down”. When wet the print can look near perfect but when it has dried it looks too dark or overprinted. This type of assessment is quite easy to master & soon becomes second nature.
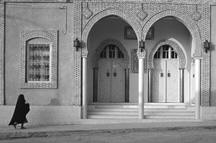
Tozeur
6.30am, first light catching the building. 35mm lens
The final stage is presentation, the final opportunity to maximise the appearance of the image. Print mounting is an art & science in itself. The correct choice of mount both in terms of size & colour is very important. Vertical or horizontal presentation can also make a big difference to the impact of the picture. Thick or thin, white or black borders must also be considered. Nothing is right or wrong, the most important thing is that the picture is enhanced by the presentation & looks & feels balanced.
Pictures once made should be shared, competitions or exhibitions are the places to see or show them. In this way standards can be set & others encouraged to make some of their own.
Most subjects convert well to monochrome; portraits can be particularly powerful. Landscapes can appear even more dramatic when shown in tones of one colour. The thing to do is to experiment & discover the monochrome world that exists all around us.
Some may read this article & feel that I am just about ready to follow in the footsteps of the dinosaurs, but one final point worthy of further thought, I believe from feedback at exhibitions, that the general public enjoys & appreciates monochrome pictures. In a photographic sense it’s where we started & I for one hope that monochrome photography & printing continues to flourish as a fine art medium.
Home About Articles Gallery Contact Prints Links